


06 Smart Objects
© Z-point - 20???
Smart Objects
=================
Adding Smart search tags to pages
=================
VERVOLG
To create a Serif Web Resources account
Creating a Site Membership Manager
Adding Smart Objects to your page
Setting up your Site Membership Manager
Protecting pages with passwords

Login forms <TOP>
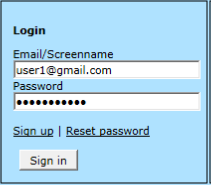 WebPlus lets you add a login/logout form onto a page in your website. This means that a registered web visitor can gain access to any restricted pages by signing in to the site.
The login box is part of your Site Membership Manager in Serif Web Resources. Registered users can either be added manually via www.serifwebresources.com or via self-
To insert a login form: <TOP>
1. From the Quick Build tab (Smart Objects), click  Login Form.
2. Position the  cursor where you want the form to be placed, then click the mouse.
3. If you don't have a Serif Web Resources account (or are logged out), you'll get the Serif Web Resources login dialog. To sign up, click Create Account under the New User? section.
-
If you're an existing user and are already logged in, you'll get a Site Membership Managers dialog.
4. From the Site Membership Managers dialog, select the Site Membership Manager for your site. If you haven’t already created one, click Create New. (See Site Membership Manager on p. 99)
5. In the Edit dialog, several options are available:
• Click Configure to set the appearance of your form.
• Click Manage to access www.serifwebresources.com to set up your Site Membership Manager.
• From the Appearance settings box, set a color for your background, border, text/labels, and buttons.
6. Click Insert to add the form to your page.
Inserting a blog <TOP>
A blog acts as a personal journal on your web page that hosts your own published articles and offers an easy-

In WebPlus, blogs are actually Smart Objects, a common term to indicate that they are intelligent server-
As a blog owner, you can manage the blog. Articles can be added, edited, or removed, while visitor's article comments can be deleted. Another feature is the ability to allow multiple authors to add articles to your blog (see WebPlus Help).
!!!-
If you're on the move or working remotely, you can always monitor
and update this managed content by using Serif Web Resources. A
republish of your website is not necessary.
-
Inserting blogs <TOP>
Blogs are like any object in WebPlus, in that you can easily insert one
onto a chosen page.
To insert a blog (on the page): <TOP>
1. From the Quick Build tab (Smart Objects category), click  Blog.
Blog.
2. Drag the  cursor across your page to define the size of
your blog region.
3. If you don't have a Serif Web Resources account (or are logged
out), you'll get the Serif Web Resources login dialog. To sign
up, click Create Account under the New User? section.
-
If you're an existing user and are already logged in, you'll get a
Site Membership Managers dialog.
4. From the Site Membership Managers dialog, select the Site
Membership Manager for your site. If you haven’t already
created one, click Create New. (See Site Membership Manager
on p. 99)
5. From the Configure dialog, enter a Name for your blog. This is
the blog title that appears at the top of the published blog.
6. Click Save.
!!!-
If you've created a Site Membership Manager previously, steps 3 and 4 are not required.
Once added to the page, you can Edit, Configure, and Manage the blog by right-
-
Your blog can be edited to change its appearance and number of articles to view.'
To edit your blog: <TOP>
• Double-
For more details about Serif Web Resources account control, see
Using Smart Objects (p. 92).
Managing your blog <TOP>
Managing your blog lets you add, edit, or delete articles, and edit
comments associated with articles. You can also select an Editor group
for multi-
you can create/edit your article in RTF, add tags, pick an article poster,
allow trackbacks, and make comments.
To manage your blog: <TOP>
• Select the blog and click  Manage from the context toolbar.
!!!-
For more management information and a description of each
option, click the Help button in the blog's Smart Object dialog.
-
For more information about Smart Objects, see WebPlus Help.
Inserting a forum <TOP>
WebPlus lets you insert a forum Smart Object into your site, which can be structured into separate categories containing one or more subforums.
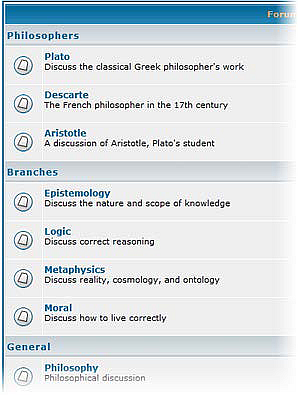
For example, you could create the categories Philosophers, Branches, and General, while the Philosophers category would include the subforums Plato, Descarte, and Artistotle.
Visitors can view the topics posted in a subforum, the number of replies/views, the topic author, and the last post.

Within a selected subforum, a topic can be created by a forum visitor which can be viewed and/or optionally replied to by other forum visitors (by posting a message in response). This discussion forms the basis of forum debate, creating a "thread" of visitor replies.
Forum contributors simply register and enter their own login details to post or reply to topics.
Forum features <TOP>
• Create different categories (e.g., Philosophers) containing
multiple subforums (Plato, Aristotle, Descartes, etc.).
• Establish access control for users and moderators.
• Set forum privacy as publicly readable or private.
• Apply a theme (style) to the whole forum.
• Create, edit, and assign user ranks.
• Set user permissions.
• Manage and moderate the forum without republishing.
!!!-
If you're on the move or working remotely, you can always monitor
and update this managed content by using Serif Web Resources. A
republish of your website is not necessary.
-
Inserting a forum <TOP>
A forum can be added to the page like any other object, although you have the option to present the forum in a full-
The forum has to be connected to a Site Membership Manager on creation. The Manager is site-
To insert a forum (on a page):
1. From the Quick Build tab (Smart Objects category), click  Forum.
2. Drag the  cursor across your page to define the size of your forum region.
3. If you don't have a Serif Web Resources account (or are logged
out), you'll get the Serif Web Resources login dialog. To sign
up, click Create Account under the New User? section.
-
If you're an existing user and are already logged in, you'll get a
Site Membership Managers dialog.
4. From the Site Membership Managers dialog, select the Site
Membership Manager for your site. If you haven't already
created one, click Create New. (See Site Membership Manager
on p. 99.)
5. From the Configure dialog, enter a Name for your forum. This
is the forum title that appears at the top of the published forum.
6. Add a Forum Description to describe what the forum is for.
7. Click Save. The forum appears on your page.
!!!-
Once added to the page, you can Edit, Configure, and Manage the forum by right-
You can also create a forum by selecting Smart Object from the Insert menu.
-
To edit your forum: <TOP>
• Double-
!!!-
For more details about Serif Web Resources account control, see Using Smart Objects (p. 92).
-
Managing your forum <TOP>
Up to now, you've just created a default forum—a single subforum within a single category. To edit category name, subforum name, and add more categories and/or subforums within those categories, your Site Membership Manager in Serif Web Resources has to be used. The Manager also lets you set up forum security such as creating moderators, adding users manually, banning or suspending users, along with controlling forum privacy, applying themes, and controlling user ranking (most posts).
To manage your forum: <TOP>
• Select the forum and click  Manage from the context toolbar.
Forums, by their nature, are complex objects. For more configuration details and a description of options, click the Help button in any Smart Object dialog.
Inserting a site search <TOP>
WebPlus offers a choice of powerful search options depending on how (and what part of) your website is to be searched. The two search options available are:
• Online Search: A user's search terms match with text content on pages in your site, including those containing text frames, tables, and Smart Objects such as blogs, forums, CMS, etc. Smart tags can be assigned to pages in advance to limit searching to just those pages.
• Client-
!!!-
The Online Search option uses Serif Web Resources to perform the search so you'll need to have a Serif Web Resources account and a Site Membership Manager created in the account to use the feature.
Neither search option can search offsite links, only pages in your site.
-
For both options, the search facility is created by combining a Site
Search Form object with a Site Search Results Frame.

Site Search Results Frame — creates a frame in which the search results are displayed. Typically, this is placed and sized onto its own page, and does not appear in the site navigation structure.
You'll normally position the search results frame ahead of adding the Site Search Form.
 Site Search Form object—the text box in which users type the word or phrase they want to search for. This object is usually added to a master page so it appears on all pages of the site.
The search results show a hyperlinked page name heading plus associated web page text for reference. Visitors simply click the hyperlink to access the web page.
Setting up Online Search <TOP>
Online Search uses Serif Web Resources to allow searching of page text content including server-
To add Site Search Results: <TOP>
1. Choose Site Search from the Insert menu and select Site Search Results from the submenu (placing your search resultswindow on your page after configuring it).
-
2. Select  Site Search Results Frame on the Quick Build tab (Smart Objects) and drag the insert cursor across your page to place your search results window.
3. From the dialog, select various options to alter the appearance of results text and/or hyperlink text.
!!!-
Keep the search results on a separate page which can have its own
look and feel (double-
appearance).
-
To add a Site Search Form: <TOP>
1. (Optional) Select a master page from the Pages tab to allow the search form to be displayed across the site.
2. Choose Site Search from the Insert menu and select Site Search Form from the submenu. Click the insert cursor to place your site search form object.
-
Drag  Site Search Form from the Quick Build tab (Smart Objects) onto your page.
3. From the Insert Site Search Form dialog, enable the Online Search.
4. Select the previously created search results object from the Results Object drop-
5. To set up Smart Search Properties via Serif Web Resources,
click Select Site Membership Manager. In the dialog, select the Site Manager for your site from the list or click Create New to create a new Site Manager.
!!!-
The Site Membership Manager must be using the same URL as your
website. If they do not match the Online Search feature will not
work.
-
6. (Optional) Check Use custom text.. to display a message while search results are being compiled ready to display.
7. Check a tag name from the Smart Search Tags box to restrict searching to just the pages previously assigned that tag via Page Properties.
8. (Optional) Use the other tabs to control the appearance and properties of the search form.
To edit the appearance of site search form or site search results
frame:
• Double-
settings as appropriate.
Adding Smart search tags to pages <TOP>
The Online Search option can be made to search only pages that have been previously tagged with a Smart tag. When configuring your Site Search Form you can then select the tag names to restrict your search.
To add a Smart tag:
1. Right-
2. From the Search Engine>Smart Search Tags menu option,
type your tag in the New tag field.
3. Click  Add.
Add.
Indexing your website <TOP>
Once you've published your site, an important final step is to initiate the indexing of the site. This will allow web visitors to use the Online Search feature without delay.
To index your website: <TOP>
• Go to your website's page containing your search form, then carry out a search for any search term present in your site.
To monitor the indexing status of your site at any time, go to your Site Membership Manager on www.serifwebresources.com and select the Advanced tab, then the Site Search tab.
If you make major changes to your site content subsequently you can manually force a re-
!!!-
Site Search may be unavailable for a time while page content is indexed.
-