


09 Forms
© Z-point - 20???
Forms
=================
Creating forms from a template
=================

Inserting forms <TOP>
Web-
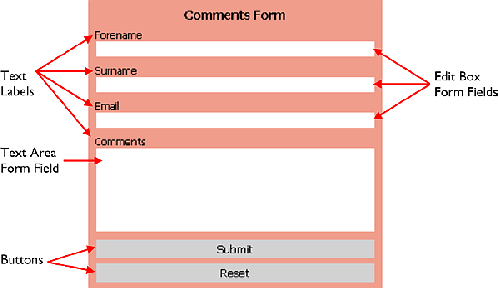
Form Structure
The building blocks of a form comprise a mixture of text labels and form fields. A field can be for a button, edit box, date picker, text area, combo box, check box, radio button, file upload, or CAPTCHA object. A typical form, perhaps an email feedback form, is made up of a combination of some of these fields.
From the web visitor's perspective, information is typed into text boxes or selected from check boxes, radio buttons, or drop-
Each field has its own set of properties relating to its appearance, its value(s), validation, or the action expected of the field.
A form's functionality only becomes active when your website is published (of course you can still preview your forms from within WebPlus, see Previewing your site on p. 155). When a web visitor enters data into, or selects a form option, the data will be sent back to a chosen destination when the form is submitted.
Creating forms <TOP>
Two methods exist for creating forms:
• Using a form template from Form Designer, a purposely designed environment for creating and modifying forms. You can choose to keep the template as is or modify it to your requirements.
Form Templates are available for user appointments, comments, and login. Other popular forms that could be created from scratch by the user include CV submission forms and canvassing forms.
• Using an on-
Quick Build tab.
Creating forms from a template <TOP>
The easiest way to create commonly used forms is to select one of the Form Designer's impressive range of form templates. These templates can be used without modification so they're almost ready to go—all you need to decide is where the submitted form data should be sent to. It's also easy to modify the template to your requirements by adding, deleting, or modifying individual fields.
To create a form using a template: <TOP>
1. From the Quick Build tab, select  Form from the Forms category and click on the page.
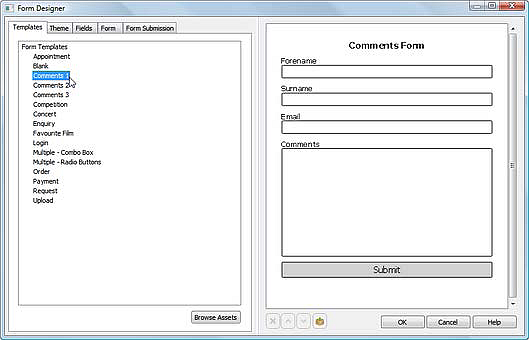
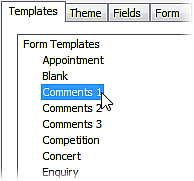 2. From the Form Designer, ensure the Templates tab is selected, then select a form template from the tab pane (e.g., Login, Appointment, etc.). Use the right-
3. From the Theme tab, select a specific look for your form.
4. (Optional) From the Fields tab (Add Field), click additional field to add them to your form. Delete unwanted fields or rearrange fields using the buttons under the preview page.
5. From the Forms tab, set a Form Name, Form Title, and Width for the form (not form fields).
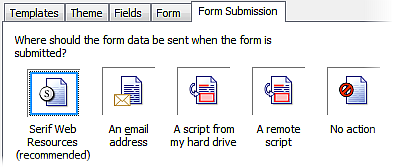
6. From the Form Submission tab, choose a destination for your form data by clicking a destination button for email, or script file (local or remote), or Serif Web Resources and a name to define the whole form. (See Submission of forms).
7. Click OK.
!!!-
If you haven't set up form submission, you'll be prompted to return to the Form Designer (by clicking Cancel) and set up how a user's form data is to be submitted. If you click OK, it's assumed that you'll set up form submission later.
-
The form is added to your page.
Customizing template forms <TOP>
If you've selected a template form you can customize it to your own requirement. Form fields can be modified, reordered, or removed.Additional form fields can also be added.
To modify a field:
1. From Form Designer (Templates tab), double-
2. Edit the Field Properties in the Fields tab. Options differ depending on the type of form field selected.
3. Use the default internal Name for the field (to uniquely identify it) or edit it, and then modify the Label to accompany the form field (this is shown on-
To reorder fields:
• Select a form field in the preview window, then click  Move Up or
 Move Down.
To remove a form field:
• Select a form field, and click  Delete.
To add additional fields:
• Select the Fields tab (Add Field) and click the type of field you want to add.
!!!-
To add supporting text to your form (e.g., a competition question), you can click Text Label in the Advanced category.
-
For pre-
Creating forms from scratch <TOP>
If you're looking for design freedom, WebPlus lets you create a blank
form directly on the page to which you can add form fields.
To create a blank form from scratch:
• From the Quick Build tab, Ctrl- Form from the
Forms category to the page.
The blank form, composed of a blank form area and a Submit button, is added to the page. You can then add form fields to the form easily.
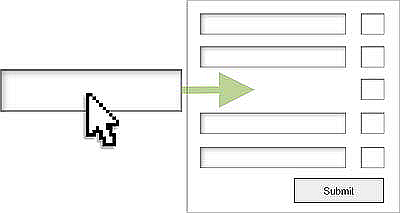
To add form fields to the form:
• Click a form field, e.g. an Edit Box, on the Quick Build tab and then click in a form area to place the field. Once form fields are positioned within the form, they are attached to it. You can position the form and individual form fields using dynamic guides, page guides or column/row guides like any other objects.
Forms as Assets <TOP>
Some forms and form fields are assets, and as such belong to specific asset packs. WebPlus lets you navigate from the Form Designer to your Asset Browser and select an alternative form template (or form field) to use.
You can also store any custom field or entire form to a custom asset
pack for future use. Fields can also be loaded from an Asset pack.
To access forms via the Asset Browser:
1. In Form Designer (Templates tab), click Browse Assets.
2. Select a form from the Asset Browser's Page Content>Form Templates category.
If you wish to store your own form field that you've modified from a template or created from scratch, it can be saved as an asset. See WebPlus Help.
Editing forms on the page <TOP>
If you've created a form using a template it can be edited in Form Designer at any time. Forms created from scratch can be edited directly on the page.
To edit a template-
1. Double-
2. In the Form Designer, select a form field for editing or apply a different theme from the Theme tab.
On the page, the form will always remain locked to prevent accidental editing. If you want to have form design freedom you can unlock it.
To unlock a template form for editing:
• From the Form context toolbar, select  Unlock Form.
!!!-
Once you've unlocked your form, you'll gain design freedom, but
won't be able to use the Form Designer again. Also, field labels will
no longer be connected to their fields as in Form Designer.
-
Unlocked forms and forms you create from scratch can be edited using normal object control in WebPlus. The form bounding box can be resized, pictures can be added to the form, the form can take a background color (from the Color tab), and form fields can be ordered and rearranged. Form field properties can also be edited independentlyof Form Designer.
To edit form fields:
• Double-
Submission of forms <TOP>
All forms have one thing in common—they must be submitted to allow data to be collected. This is done by the website visitor using a dedicated Submit button available as a form field when using Form Designer or when creating a form from scratch. The button needs to be present on the form and is typically used with a Reset button to clear all form fields of data.
Where is data sent?
After submission, form data can be sent to one of the following:
• Serif Web Resources; for transit of submitted form data to your email (via Serif).
• an email address (of the web developer).
• a script file (stored locally or remotely); this could write text to a text file or into a server database.
These submission options can be set up within Form Designer, using the Form Submission tab. Options have shared settings or settings independent of each other.
To set up Serif Web Resources submission:
1. With the Serif Web Resources icon enabled, click the Select button adjacent to the Email Address field (log in to Serif Web Resources if you're not already logged in).
2. From the dialog's Add new box, enter the target email address and click Add new.
The email entry is created and added to the list. You'll notice that the entry is classed as Confirmed "No". Before the service commences, you'll get an email confirmation message sent to your email address. By clicking the link, the service will be activated and the entry will change to Confirmed "Yes".
Click  Close.
3. Back in Form Designer, select a Target Window or Frame in which a basic confirmation page is presented on submission. Select from the drop-
4. Select a Subject Field. This sends the submitted form field data for a selected form field as the subject line of the email. Great for combo boxes, where emails can be easily sorted by subject line.
5. Check Time Zone and a city/region according to the website's location.
6. Select Email Format if the email is to be sent as plain text, HTML, or both. Format lets you set header text or footer text.
7. Check Attach Data as Zip File to bundle the submitted form data as a ZIP file, attached to the email.
8. Click More Recipients to add additional email addresses to send the form data to. These must already exist as form email targets.
9. Select the "Email" field from the Confirmation Field dropdown list if you want to automatically send an email confirmation back to the web visitor. (see below).
10. Click OK.
!!!-
To protect against spam emails, Serif Web Resources uses a
reCAPTCHA gateway if you haven't added a CAPTCHA or
reCAPTCHA form field directly to your form. On form submission,
this enables a security check offering a random text string for the
web visitor to reproduce in a text box.
-
To set up an email address submission
Use the email address option to bypass the usual POST/GET submission methods. When the Submit button is pressed the web visitor's default email program is launched. The form data (passed in as a single string of text) is added to the email body and is ready to be sent to the configured email destination. Especially useful if there is no local or remote scripting in place.
!!!-
This is an unsecure submission method—any private or confidential
information will not be encrypted.
-
To set up email directly:
With the A remote script icon enabled, enter the destination Email Address (or select an already known email address from the drop-
To set up a local script file:
The A script from my hard drive option is for experienced web developers with scripting expertise.
Navigate to and select your local script file, typically a .php, .js, .cfm, .cgi, .pl, .dll, or .exe file with the Browse button.
To set up a remote script file:
Use if your web host will not allow you to run your own scripts on your web space. Instead, your web host may supply a basic script file that can be linked to from your web page. Typically, the script will send the form data back to your email address (already setup with your web host).
1. With the icon opposite enabled, add a Form name.
2. Enter a URL pointing directly to a script file.
Choose a submission method, encoding type, target window/frame, and Character set.
To take no action:
Form data is not submitted. This option is useful if you want to temporarily disable data collection or if you haven't yet set up scripting or Serif Web Resources. At a later time you can edit the form (right-